


| « Don't Forget the Wine! | Windy City Blogger Wednesday: The View from the 32nd Floor » |
Feature Wed Nov 25 2009
Shaking Up Thanksgiving
When it comes to Thanksgiving meals, cooks nationwide demonstrate the same focus that Montgomery and Eisenhower did for Operation Overlord. Planning the dinner courses and their courses of action with a critical eye and hard heart, woe betide to the poor fool who, like the Germans at Normandy, stands in their way.
The sheer variety of ways to prepare a turkey boggles the mind. Do you brine it or not? Roast it or fry it? Traditional sage and thyme, or go avant-garde with a rub of butter and chipotle powder beneath the skin? Baste it? Legs tied for presentation, or untied for more even cooking? Stuff the bird and risk salmonella? It's enough to drive a cook crazy, even before the drinking starts.
And that's why instead of turkey, I prefer the standing ribeye roast.
Beef was probably NOT on the pilgrim's first menu, as there is no record of cows being carried on the Mayflower. There were pigs, but as it was the first year of the colony, it's probable that none were slaughtered for their hams, which means that the pilgrims really had to make do with what was close by: goose, duck, crane, and wild turkey, venison, seal, lobster, fish, eels, and clams for the possible meats with pumpkin, beans, peas, onions, radishes and carrots for the veg.
But the standing ribeye roast is a treat. Thick, well-marbled, and delicious, it's essentially a roast of ribeye steaks. Much simpler to prepare than turkey, it allows the cook time for the important things, like catching up with family and imbibing copious amounts of bourbon.
Preparing the Roast
When looking for the right ribeye roast, larger is better. Larger cuts can handle the vagaries of temperatures in the average home oven, and it will cook more evenly than a smaller cut. On average, I don't go below 5 pounds for my roasts. Usually local supermarkets will have a special on ribeye roasts as the holiday season approaches, so take advantage of these! Otherwise go to a reputable butcher shop and pay a little extra. The butcher also can remove and tie back on the chine and the ribs if you request it.
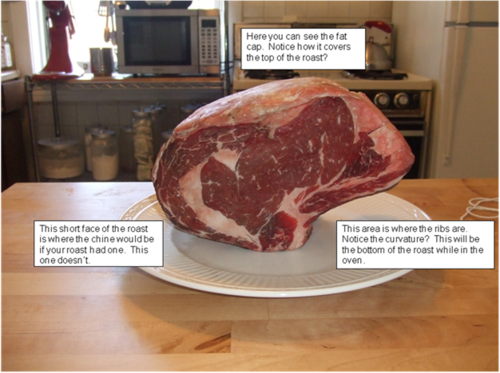
If you're getting your ribeye roast from a supermarket, most of the time the ribs are still there, but the butchers have removed the chine, or feather bones, off the top end of the rib. If yours has them, cut them off, but DO NOT THROW THEM AWAY! You'll want to tie them back onto the roast.
You also want a large cap of fat on the top of the roast. Without this cap, the roast will be dry and much less savory.
So how do we get to deliciousness? Glad you asked. Let's talk about dry-aging.
Dry-aging is what butchers and restaurants do to make cuts of beef more delicious and tender, and it's achieved through two actions: the removal of excess water (essentially dehydration), and the introduction of friendly bacteria that break down the tough connective tissue within the cut. If you have a meat locker where you can manage humidity and ensure air circulation, you can dry-age your own cuts. Unfortunately, a meat locker isn't a typical option for the average homeowner. But you can take a couple of step in that direction.
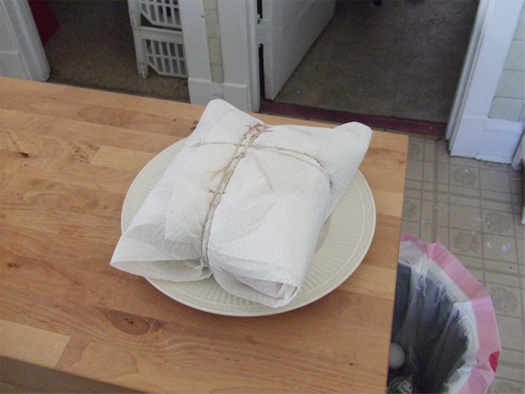
First off, when you get your roast home from the store, open the packaging and toss it away. Rinse the roast completely, and pat it dry with paper towels. Then, taking fresh clean paper towels, swaddle the roast in several (at least two) layers of them. Tie it off with cooking string.
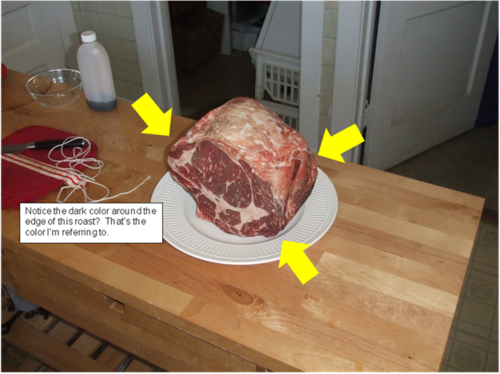
Put it in the refrigerator. Change the towels every day. As you change the towels, you should notice a darkening of the meat. Some meat from a supermarket is treated with Carbon Monoxide (CO) to make it much more red and fresh looking. As the water is removed and the CO leaves the meat, the flesh will take on a rich crimson color.
If there is a slimy area and a foul odor, something is wrong and the meat is rotting instead of pseudo dry-aging. Throw it away, and check your refrigerator temp (should be 36° F/2° C). The exterior of the roast should be dry and cool. Do this for at least 3 days.
It's not necessary to try your hand at this pseudo dry-aging to achieve a delicious roast. It's just one of my preferences. You can simply open the package and away you go!
On the day you're planning to cook the roast, remove the roast from the refrigerator, and let the roast come to room temperature. I let my roast sit wrapped on the counter for about two hours or so to reach room temp. This is a thick slab of flesh and it takes time to change temperature internally. Food safety guidelines state that the temperature danger zone is between 40° F and 140° F and that food should remain in that zone no longer than 2 hours.
Cooking the Roast
So regardless of whether you've tried your hand at some homemade dry-aging or simply unwrapped the roast right from the store, it's time to get your oven hot. Before even turning on the oven, remove all your oven racks except for one and ensure that it is set low enough to allow enough room for the roasting pan and the roast.
My copy of The Joy of Cooking states to "Preheat the oven to 550°." I usually set the oven to Broil and give it at least 30 - 45 minutes to get NASA-reentry hot.
As you near your cooking time, remove the paper towels, and rinse the roast off. Pat it dry with clean paper towels. When it comes to seasoning the roast, I'm a purist. Kosher salt and fresh cracked black pepper. But feel free to add rubs or other seasonings to your heart's content.
Here's where the rubber meets the road. Place your roast, fat cap side up, in a roasting pan. I strongly advise using a roasting rack so you can collect the drippings for a savory Yorkshire pudding.
Place the roast in the oven. Let the oven remain set at that high heat (Broil or 550° F) for the first 10 to 15 minutes of the cooking time. After the initial high heat, drop the temperature to 200° F and let the waiting begin. The main key to ensuring a delicious result is to cook the roast slowly and let it baste itself (the fat cap does this) with slow consistent heat. There is no need to open the door of the oven until the roast is done.
The best way to ensure the meat is done is to use a probe thermometer. Make sure the probe reads off the deepest part of the meat and that you're not touching a bone. My preference is a digital thermometer with the braided metal cable that connects to a base outside of the oven. It allows for a consistent read from the roast without having to open the door to the oven.
Is It Done Yet?
According to the USDA, for steaks and roasts the minimum safe internal temperature is 145° F. If you allow for carry over cooking, a roast may gain an additional 10 - 15°. Unfortunately, even pulling a standing ribeye roast at an internal temp of 130° F means you've probably overcooked it. If food safety is important to you, definitely cook the roast to 130° F. But...
...for the juiciest rare and red cuts, pull the roast when the internal temp reaches 110° F, and for medium rare, pull the roast when the internal temp reaches 115° F.
Put the meat on a plate or cutting board, cover with aluminum foil, and let the meat rest for 30 minutes.
Cutting and Serving
Once I've got everything ready for plating, the first thing I do is remove the ribs. Take a sharp boning knife and follow the contour of the ribs, remove them, but DO NOT THROW THEM AWAY! There's some of the most delicious meat on a cow surrounding those things. As the cook, I usually claim them, but if you're generous, you can add one to each plate. If you've got mad knife skills cut each slice and leave the rib attached for a delicious ribeye steak sort of treat. Or you can toss them in a zip top bag and freeze them to add flavor to a soup or stock sometime in the future.
Stand the roast back up, and with a large sharp carving knife, slice the roast with as much of an even stroke as you can manage. The end piece on each side will have the most flavor (due to being exposed to heat, and spices), so give those to the folks you like the most. The thickness of each slice is up to you and the sharpness of your knife. I like going the way of prime rib/steak and making the slices good and thick, but again, it depends on your guest's tastes and how many of them there are.
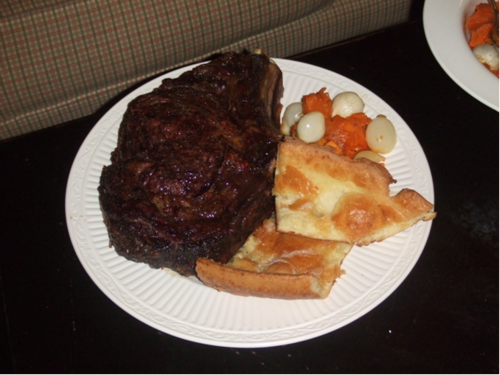
Serve with Yorkshire pudding, horseradish sour cream, and salt-crusted roasted root vegetables for a different and delicious holiday dinner.
Bon Appetit!


uhi / November 28, 2009 7:44 PM
Looks awesome.